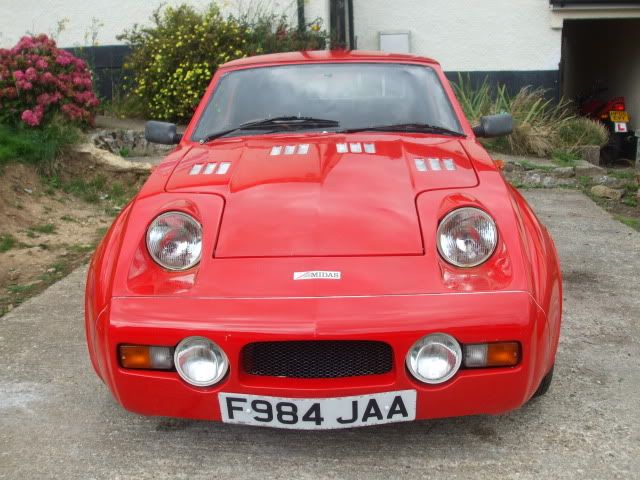
Mk 1 Project Zippy. Looking Like a Car.

If you're taking on the task of rebuilding the whole Midas, please put the project in here.

Moderator: The Midas Forum Staff

Re: Mk 1 Project Zippy (Picture Heavy!)

Postby DavidL » Sat Oct 20, 2012 3:57 pm

MrBounce wrote:Have not been out into the garage much recently due to mainly not having the parts or equipment to do stuff, nor the folding stuff either. Saving for a holiday takes too much car money! :lol:

I have however come to the decision that the single line brake system needs upgrading. The Master Cylinder that was on the car when I bought it would have needed a full rebuild anyway so it seemed a perfect time to upgrade. I bought a "Yellow Tag" item for an 80s Mini - I had 3 Minis with this set-up (with 8.4" discs and no servo) and they all had excellent brakes.

However, a trial fitting showed up a problem: it was too tall. The new Master Cylinder stands 193mm above the bracket it sits on, and I had roughly 184mm to play with. I had to options: get a smaller Master Cylinder or find some way of making it fit. Not one to mess about, I put a small blob of grease on to its highest point and carefully shut the bonnet. This then left a mark on the "stiffening ribs" which was where it was fouling. The ribs are about 12-15mm so I marked out in chalk where I needed to cut then cracked on with the Dremel. A couple of small adjustments and some tidying up and all fitted perfectly. I will be able to finish it off properly once I get some fibreglass matting & resin. I will also sort out a front to rear proportioning valve for the bulkhead.

That's odd, I don't remember having a height problem with my Bronze's master cylinder, and I don't remember Harold Dermott ever mentioning that some Mini master cylinders wouldn't fit. Was that for a particular Mini? The one I used was the one recommended for the 1275GT, as far as I can recall.
User avatar
DavidL
 
Posts: 865
Joined: Tue Mar 01, 2011 10:15 pm
Location: Tayport, Fife

Re: Mk 1 Project Zippy (Picture Heavy!)

Postby Stuart » Sat Oct 20, 2012 4:22 pm

This is only an issue on the MK 1, the MK 2 has a slightly different bonnet ;)

I may add that I was unaware of the problem until now.
User avatar
Stuart
 
Posts: 1732
Joined: Tue Dec 02, 2008 8:29 pm
Location: Derbyshire

Re: Mk 1 Project Zippy (Picture Heavy!)

Postby MrBounce » Sat Nov 03, 2012 5:47 pm

I have turned my attention to the bodywork now that most of the mechanical bits are off the car. There is an alarming amount of cracking by the bumper/front panel/front wings and I have no doubts that this car has been driven into something at some point. The attempts to repair it have been rather poor, with lots of filler and the total disregard for any crack rectification.

I started with grinding out the cracks on the passenger side wing by the headlight and where the repeater used to sit. I don't like repeaters on the Midas - I think the ones that were on my car came from a Maxi or similar and were so knackered they went straight in the bin. I will probably replace them with something else small, maybe from a Fiesta or something. Suggestions welcome! Then again, I might not fit some at all... There were a large number of cracks but they have ended up making a pretty pattern. It looks like a map of a large Motorway junction now...

Then I moved to the front of the car. Initially I thought there was an enormous chunk of filler in the front but it was difficult to tell because it had been primered and/or repainted really badly. I spent a few minutes sanding it with some 60 grit, and I was greeted by some good news and some bad. There wasn't as much filler as I had expected (a lot was primer which sanded off) but there were at least two applications and not all of it was blended properly. There was a massive crack where the filler met the fibreglass - some of the fibreglass actually fell out with minimal persuasion. I have ground down the first load of cracks that I can see but I am undecided on the best way forward for the front end. Do I keep what is there and work with it? Do I grind out all the filler and start again? I will take advice and decide later.

Finally I dealt with the chunk of filler on the bulkhead - I had a bit of a prod and a poke here - it turned out it was covering a hole in the bulkhead but I am not sure why or how the hole was made. I shall be attacking this with some fresh fibreglass in the future.

Cracks in front wing - lots of 'em!

Image

First crack ground out (still a bit to do...)

Image

Looking like a motorway junction...

Image

Sorry looking front end

Image

Sanded down. Some fibreglass broke off without much help

Image

Close up, at least two filler applications

Image

Most of the cracks ground out. What to do from here?

Image

Wad of filler on bulkhead hid this. How/why was the hole here?

Image
MrBounce
 
Posts: 661
Joined: Mon May 16, 2011 9:16 pm
Location: Suffolk

Re: Mk 1 Project Zippy (Picture Heavy!)

Postby Rich » Sat Nov 03, 2012 9:46 pm

Crikey, that looks like a relief map of the Lake District, I think I spotted Hardnott and Wrynose in there...
User avatar
Rich
 
Posts: 1285
Joined: Wed Dec 03, 2008 1:27 am
Location: Devon

Re: Mk 1 Project Zippy (Picture Heavy!)

Postby mikeeskriett » Thu Nov 08, 2012 2:44 pm

Looks like a pretty standard front end knock. Quite a few bodyshops don't understand how to properly repair fibreglass panels.

Rightly or wrongly I repair mine by grinding back the crack and stop drilling it as required. I layup some fresh fibreglass matting behind the damage and repair the gelcoat or top surface using either fresh gelgoat or more often than not either Upol-B or Isopon P40 fibre glass based filler. If you have to use filler it's best to make the surface stable as above and use a little as possible followed up by the paint. On a white car appliance white was curiously a pretty good match!!
User avatar
mikeeskriett
 
Posts: 233
Joined: Fri Dec 05, 2008 12:46 pm
Location: Peterborough

Re: Mk 1 Project Zippy (Picture Heavy!)

Postby MrBounce » Sun Dec 09, 2012 6:01 pm

Well it's been a little while since my last update. Mrs B had an operation (she's fine - nothing to worry about) so a lot of my evenings and weekends in Novemeber were spent looking after her and the house. Plus there's also the fact that recently it has been a little bit chilly in the garage... I have however been acquiring some more bits and bobs from various forums and the good ol' bay of E. I have managed to get hold of the following: two longer track-rod ends for my Negative Camber bottom arms, an LCB (my old one has a dent in the centre pipe), a brand-new Mountney D-shaped wheel along with a secondhand boss, one of the two new rubber doughnuts I need, and in my quest to avoid any likelihood of ever using a Mini heater again, an heater unit from an MGF complete with controls (Many thanks to Rob Bell for the above). I WILL make it fit!

The front end had not got any better since I last attacked it so I thought I would have a look at the filler. I made two vetical incisions through it then attacked it with a screwdriver. Yup, off flicked great chunks of it. Whoever had "repaired" it after the crash had not done a good job at all. I don't know a great deal about bodywork, but just slathering wads of filler over cracked and broken fibreglass is NOT the way forward. I spent the next half an hour chipping of great chunks of it (some of it the size of a custard cream biscuit). I then put a sander on the Dremel and ran that over the damaged fibreglass underneath. This also revealed more cracks. All of these will be properly ground out and carefully repaired.

I am not sure what the car hit, but I can only assume it was something fairly solid and immovable, like a wall - or possibly a cathedral. There are cracks all over the front end (probably due to the impact) so it is going to take an age to clean it all up. I am determined to do it properly as I want it to look half decent! Thre may well be more updates to follow which involve a great deal of Dremel use and sanding. For that I can only apologise...

Front end hiding obvious horrors.

Image

Two small grooves then flick out the crap with a screwdriver...

Image

Amazingly, there was gelcoat under it all. What a bodge!

Image

Big chunks of filler. Yuk.

Image

I am left with this...

Image

...and this...

Image

Front end looks ugly right now. To paraphrase the 6 million dollar man, "We can rebuild him!"

Image

LCB - needs a clean up and a coat of high temp paint - only cost a tenner!

Image

MGF heater. Am looking forward to the challenge of fitting this!

Image

Funky "D" shaped steering wheel and boss, all for under £35...

Image
MrBounce
 
Posts: 661
Joined: Mon May 16, 2011 9:16 pm
Location: Suffolk

Re: Mk 1 Project Zippy (Picture Heavy!)

Postby Hans Efde » Sun Dec 09, 2012 6:24 pm

It's a pity the moulds have disappeared. It would be easier to get a new Bronze nose and laminate that in. I've pics of such a repair on a Gold convertible and it's perfect.
User avatar
Hans Efde
 
Posts: 1732
Joined: Sat Dec 06, 2008 10:11 pm
Location: IJlst, Netherlands

Re: Mk 1 Project Zippy (Picture Heavy!)

Postby MrBounce » Sun Dec 16, 2012 3:46 pm

Back in the Manroom for yet more body horrors, I kept my attentions on the nearside front corner. Closer inspection reveals that this side has also been smacked about by something solid. Whoop-di-do. The area surrounding the sidelight/indicator recess has been made up from a selection of remaining bodywork and standard body filler, so that all needed chipping out. The hammer & screwdriver have become a useful pairing here. And yes, I did manage to make at least one hole. Where the bumper sits is a mass of badly applied lumpy fibreglass which I will eventually try to smooth off. Beneath the light recess is a nasty myriad of cracking (worse even than by the headlight area) so I am going to deliberately avoid this until I can get the car on its side - that way I can work at a decent height. It also (of course) goes under the bottom of the spoiler (as it's an early 80s car do I call it an "air-dam"?) so all of it will need to be re-done. I guess I am going to learn a fair bit about repairing fibreglass.

I spent the rest of the afternoon avoiding the front end and doing a bit of sanding; the front wing top, roof and pillar area and the heat affected bulkhead were my main targets. It's amazing what a bit of 60-grit will do to a surface to clear away the crud. The whole body will be resprayed anyway so I will of course be using finer grit then eventually wet & dry to get a better finish! I also have numerous holes and gouges to fill in so it is all going to take a while. More soon.

Full of filler & other assorted rubbish...

Image

Close up of the "underneath the bumper" horrors

Image

It's a cracker! There are WAY too many of these!!

Image

Most of the filler removed. Yes, it did make a hole...

Image

Wing top looking MUCH smoother (and clean!)

Image

Bulkhead area - looking a little better.

Image

Roof. Still attached and looking clean. No cracks, which makes a change...

Image
MrBounce
 
Posts: 661
Joined: Mon May 16, 2011 9:16 pm
Location: Suffolk

Re: Mk 1 Project Zippy (Picture Heavy!)

Postby Rich » Tue Dec 18, 2012 8:10 pm

The one advantage I can think of that comes with mine being in it's original gel coat is that I know there isn't stuff like this lurking under the swirly surface.
User avatar
Rich
 
Posts: 1285
Joined: Wed Dec 03, 2008 1:27 am
Location: Devon

Re: Mk 1 Project Zippy (Picture Heavy!)

Postby MrBounce » Sat Dec 29, 2012 5:24 pm

Had a bit of a tidy up in the Manroom (and boy did it need it!) and due to the cold weather not being ideal for playing around with fibreglass, I thought I would have a look at the front hubs. I have two sets; one is the set covered in Gold Hammerite (yuk!) which were on the car and the others were a pair that were in the spares box and are normal disc brake hubs.

I set about removing (and binning where necessary) the balljoints. Having hammered the lock tabs back down I then had the delights of trying to undo someone else's over-exuberant work with the torque wrench. On both of the "spares" hubs, the balljoint nuts were stupidly tight. I ended up using my 1 1/2 foot bar with a 3 foot metal pole on the end of that before they would shift. Something tells me someone did them up "as hard as they could", probably using the same method as me. The gold ones were much easier; just the weight of the bar plus a gentle lever seemed to have them clear.

You've also got to love the way something allegedly so simple can turn into a nightmare that takes stupid amounts of time. The rear oil seal on both of the "spares" hubs was seemingly welded in place. It eventually took much brutality involving heat, screwdrivers, pliers and a hammer. The bearings in the spares hubs were nasty - full of grit and not actually complete in one instance. The gold hubs seemed in better condition with fresher grease but both sets of bearings were binned anyway as they're an unknown quantity. Having given both pairs a cursory wipe down I noticed that the gold hubs are a bit, well "weird". Someone has taken a grinder to the front face and hasn't done a great job. I have no idea why they've done this but I won't be using them all the same. This car still never ceases to amaze me...

Two pairs of hubs for stripping

Image

The poxy oil seal that took far too long to remove

Image

Gritty, nasty interior. Will clean up nicely after a dunk in the parts washer.

Image

Gold hubs. There's something not quite right about them...

Image
MrBounce
 
Posts: 661
Joined: Mon May 16, 2011 9:16 pm
Location: Suffolk

PreviousNext

Return to Complete Midas rebuild

Who is online

Users browsing this forum: No registered users and 1 guest

cron