I'm going down the Jawel non-isocyanate 2k paint route as well, possibly this summer if I ever get time.
I'll be watching closely to see how you get on
Midas Cars Forum - www.midascarsforum.com
This free forum is for Midas and Midtec Bronze enthusiasts. The Midas is a British car designed as a replacement for the Mini Marcos.
Mk 2 Rebuild (to replace the company car)
Moderator: The Midas Forum Staff
18 posts
• Page 2 of 2 • 1, 2
Re: Mk 2 Rebuild (to replace the company car)
![]() by l_jonez » Thu Jun 27, 2019 11:14 pm
by l_jonez » Thu Jun 27, 2019 11:14 pm
- l_jonez
- Posts: 124
- Joined: Wed Jun 03, 2015 4:37 pm
Re: Mk 2 Rebuild (to replace the company car)
![]() by ACourtney » Thu Jul 04, 2019 1:22 pm
by ACourtney » Thu Jul 04, 2019 1:22 pm
Hi Tim,
Somehow I missed your posts here before now so I'm catching up a bit.
I may have misunderstood your first posting, but where you say "where the gelcoat has deep cracks - dremel is your friend to gouge out the gelcoat and use epoxy filler" I wouldn't be happy just to Dremel out the cracks in the gelcoat. The cracks on the front, above the radiator intake and on the NS front wing, are clearly accident damage and there is likely to be delamination underneath. I would be grinding them back using an angle grinder to provide a wider view that allowed me to see the state of the GRP underneath the gelcoat. If delamination is left behind a repair then eventually the cracks will reappear.
You will quickly see if there is delamination underneath as that appears as white opaque traces in the yellow. I'm sorry if this is teaching you to suck eggs, but for the benefit of those who have never attempted to repair damaged GRP here are a few photos from a repair I did on a Mk3 Gold recently:
Gel cracks created by a ham-fisted fitter and a non-standard rear number plate light - the star cracks have been highlighted with a chalk pen as a part of a walk around highlighting all the damaged areas needing repairs.
 20180828_151056 by Alistair Courtney, on Flickr
The cracks around the holes are fairly typically of holes drilled without enough care, or where bolts have been overtightened. The corner of the light fitting had initiated a large gel crack, so it looks like it was either overtightened, or had been drumming against the surface. There was also some evidence of micro-blistering around the top RH hole where the rubber backing of the number plate light had trapped moisture against the gelcoat.
The damage when viewed from inside the car can be seen to have spread into the laminate:
 20180828_151140 by Alistair Courtney, on Flickr
Fortunately all the damage had appeared from the outer surface and I was able to grind it out, but I had to remove quite a lot of gelcoat and laminate to get back to good laminate:
 20180828_160048 by Alistair Courtney, on Flickr
The edges of the gelcoat are well feathered back as the next step was to relaminate glass over the affected area - I had had to grind about halfway through the laminate to take out the traces of the star crack. Once I had laminated in a couple of layers of glass, I finished off the lay-up with a tissue layer to just below the surface of the gelcoat. A thin skim of bodyfiller was all that was then needed before sanding smooth.
On the later questions of painting, I would suggest using epoxy primers as they bond well to the gelcoat and are both flexible and tough enough for use on GRP. From the H&S point of view they can be sprayed wearing a good face mask (FP3), rather than needing an air-fed visor. Although the constituent parts of epoxy paint are toxic, once they are mixed the epoxy compounds are safe (if you have old epoxy paint left over then always mix the two parts together before disposing of them).
However, if you are spraying in an unventilated area, such as a garage, then keep the mask on until you leave the area. Even in a properly extracted spray booth, paint particles can hang in the air for several minutes and in an unventilated area that can become half an hour. Although the paint particles may not be toxic, they can still be irritants if breathed in and that can lead to an asthmatic type reaction, or longer term symptoms (that goes for all car paints not just epoxies).
If you go down the epoxy route then it is important to know the difference between a sealer, or locking, primer and a high build primer. The paint suppliers don't always know the ins and outs of these products so it is worth getting hold of the technical sheet for the primers.
An epoxy high build primer has filler content and is therefore easier to sand. Use this primer to hide the repairs and to take out the ripples in the gelcoat surface. Typically you want to spray on three good thick coats and then dust a guide coat over before you start flatting back. As with any high build primer, the object is to get back to the original lines of the car. You may sand back to the gelcoat in places, or you may require more localised layers of high build primer to lose low spots. You may even need to use some stopping filler, especially if pinholes appear in the primer. The epoxy does get harder with time (after all you don't want soft layers of paint sagging under your nice glossy top coat), so this is where you need to read the technical sheets to help you plan your spraying and sanding activities. The hardening process can be accelerated with heat, but unless you have a spray booth with warm air circulation, I wouldn't recommend applying heat to GRP panels after painting (I have a warped bootlid that bears testament that so-called professional painters don't always know how to paint GRP).
An epoxy sealer will dry hard and you have only a short window of time to sand it down, or scuff the surface, to ready it for the next layer of paint. Once fully hardened you can still sand the sealer coat, but it will be much harder and will clog up the paper quickly. When painting a GRP car, the best use of epoxy sealer is as a tough locking coat after you have done all your repairs and have fully flatted back the high build primer. The epoxy sealer will accept pigment and it is possible to get it mixed close to the colour that you want, which helps to hide stone chips. However, being epoxy, it doesn't have the resistance to UV light of the proper top coat and won't polish up to the level of shine that they can achieve.
Epoxy primers will accept just about any type of paint on top and if you are not confident in achieving the level of finish when spraying the topcoats then you might look at getting the final coats put on by a professional. You will have done 95% of the work by now, although the top coat paints tend to be much more expensive so you won't save 95% of the cost. Bear in mind though that the quality of the final coats does depend on all the preparation and finishing of the primer coats and they in turn depend on the repairs you do to the GRP. There is nothing worse than spending a lot of time and/or money on painting a car only for cracks to reappear when the car starts getting driven again.
Somehow I missed your posts here before now so I'm catching up a bit.
I may have misunderstood your first posting, but where you say "where the gelcoat has deep cracks - dremel is your friend to gouge out the gelcoat and use epoxy filler" I wouldn't be happy just to Dremel out the cracks in the gelcoat. The cracks on the front, above the radiator intake and on the NS front wing, are clearly accident damage and there is likely to be delamination underneath. I would be grinding them back using an angle grinder to provide a wider view that allowed me to see the state of the GRP underneath the gelcoat. If delamination is left behind a repair then eventually the cracks will reappear.
You will quickly see if there is delamination underneath as that appears as white opaque traces in the yellow. I'm sorry if this is teaching you to suck eggs, but for the benefit of those who have never attempted to repair damaged GRP here are a few photos from a repair I did on a Mk3 Gold recently:
Gel cracks created by a ham-fisted fitter and a non-standard rear number plate light - the star cracks have been highlighted with a chalk pen as a part of a walk around highlighting all the damaged areas needing repairs.
20180828_151056 by Alistair Courtney, on FlickrThe cracks around the holes are fairly typically of holes drilled without enough care, or where bolts have been overtightened. The corner of the light fitting had initiated a large gel crack, so it looks like it was either overtightened, or had been drumming against the surface. There was also some evidence of micro-blistering around the top RH hole where the rubber backing of the number plate light had trapped moisture against the gelcoat.
The damage when viewed from inside the car can be seen to have spread into the laminate:
20180828_151140 by Alistair Courtney, on FlickrFortunately all the damage had appeared from the outer surface and I was able to grind it out, but I had to remove quite a lot of gelcoat and laminate to get back to good laminate:
20180828_160048 by Alistair Courtney, on FlickrThe edges of the gelcoat are well feathered back as the next step was to relaminate glass over the affected area - I had had to grind about halfway through the laminate to take out the traces of the star crack. Once I had laminated in a couple of layers of glass, I finished off the lay-up with a tissue layer to just below the surface of the gelcoat. A thin skim of bodyfiller was all that was then needed before sanding smooth.
On the later questions of painting, I would suggest using epoxy primers as they bond well to the gelcoat and are both flexible and tough enough for use on GRP. From the H&S point of view they can be sprayed wearing a good face mask (FP3), rather than needing an air-fed visor. Although the constituent parts of epoxy paint are toxic, once they are mixed the epoxy compounds are safe (if you have old epoxy paint left over then always mix the two parts together before disposing of them).
However, if you are spraying in an unventilated area, such as a garage, then keep the mask on until you leave the area. Even in a properly extracted spray booth, paint particles can hang in the air for several minutes and in an unventilated area that can become half an hour. Although the paint particles may not be toxic, they can still be irritants if breathed in and that can lead to an asthmatic type reaction, or longer term symptoms (that goes for all car paints not just epoxies).
If you go down the epoxy route then it is important to know the difference between a sealer, or locking, primer and a high build primer. The paint suppliers don't always know the ins and outs of these products so it is worth getting hold of the technical sheet for the primers.
An epoxy high build primer has filler content and is therefore easier to sand. Use this primer to hide the repairs and to take out the ripples in the gelcoat surface. Typically you want to spray on three good thick coats and then dust a guide coat over before you start flatting back. As with any high build primer, the object is to get back to the original lines of the car. You may sand back to the gelcoat in places, or you may require more localised layers of high build primer to lose low spots. You may even need to use some stopping filler, especially if pinholes appear in the primer. The epoxy does get harder with time (after all you don't want soft layers of paint sagging under your nice glossy top coat), so this is where you need to read the technical sheets to help you plan your spraying and sanding activities. The hardening process can be accelerated with heat, but unless you have a spray booth with warm air circulation, I wouldn't recommend applying heat to GRP panels after painting (I have a warped bootlid that bears testament that so-called professional painters don't always know how to paint GRP).
An epoxy sealer will dry hard and you have only a short window of time to sand it down, or scuff the surface, to ready it for the next layer of paint. Once fully hardened you can still sand the sealer coat, but it will be much harder and will clog up the paper quickly. When painting a GRP car, the best use of epoxy sealer is as a tough locking coat after you have done all your repairs and have fully flatted back the high build primer. The epoxy sealer will accept pigment and it is possible to get it mixed close to the colour that you want, which helps to hide stone chips. However, being epoxy, it doesn't have the resistance to UV light of the proper top coat and won't polish up to the level of shine that they can achieve.
Epoxy primers will accept just about any type of paint on top and if you are not confident in achieving the level of finish when spraying the topcoats then you might look at getting the final coats put on by a professional. You will have done 95% of the work by now, although the top coat paints tend to be much more expensive so you won't save 95% of the cost. Bear in mind though that the quality of the final coats does depend on all the preparation and finishing of the primer coats and they in turn depend on the repairs you do to the GRP. There is nothing worse than spending a lot of time and/or money on painting a car only for cracks to reappear when the car starts getting driven again.
-

ACourtney - Posts: 488
- Joined: Thu Dec 04, 2008 12:22 pm
- Location: Oxford
Re: Mk 2 Rebuild (to replace the company car)
![]() by Gustywinds » Fri Jul 05, 2019 10:10 am
by Gustywinds » Fri Jul 05, 2019 10:10 am
Wow, you have made great progress on this.
I looked at buying this car unseen (although the owner did send me a huge number of photos). When it sold at such a low price I was kicking myself. But if I had bought it it would still be languishing under a cover in my driveway as I still haven’t got my garage let sorted out.
I will be following this with great interest as I do hope to get a Midas to rebuild in the not too distant future.
- Gustywinds
- Posts: 5
- Joined: Sun May 19, 2019 1:12 pm
- Location: Aberdeen
Re: Mk 2 Rebuild (to replace the company car)
![]() by ACourtney » Fri Jul 05, 2019 1:05 pm
by ACourtney » Fri Jul 05, 2019 1:05 pm
I came across this photo of a Gold Coupe at the flatted down high build primer stage. I should have mentioned in my previous post that the car had already been flatted back using P180 strips on a long sanding board. This was done in a cross hatch fashion, i.e. at around 45 degrees to the lines of the car and then again the other way, to provide a good key for the epoxy high build primer. The P180 will take out the worst of any high spots, although it can be surprising what still stands out.
 CIMG2310 by Alistair Courtney, on Flickr
The gelcoat can be seen showing through in several places, but that is fine as the locking coat of epoxy primer sealer has yet to go on at this point. Of note is the high spot ridge revealed on the upper rear flank behind the side window. This is where an inner panel is bonded to the outer skin to form a box section and over time the inner panel has pushed outwards. All unpainted (and several painted ones) will have a ridge here. A similar effect can be seen on the boot lid of the Gold convertible where the reinforcing frame distorts the outer panel.
The important part at this stage is to get the surfaces right. You will notice that the spray booth has strip lights with clear glass covers. This is so that the reflection of the lights will appear as straight lines on a flat surface, and curved lines on curved surfaces. Any ripples, high spots, or low spots will appear as ripples in the line of the reflected light. The painter will move his head to follow the reflection across a panel to check that the line of the light follows a smooth transition across the curves.
The next photo was taken immediately after the locking coat was applied and before it had been scuffed up. The reflection of the light strips in this photo illustrate how the lines of the car can be observed.
 CIMG2323 by Alistair Courtney, on Flickr
CIMG2310 by Alistair Courtney, on FlickrThe gelcoat can be seen showing through in several places, but that is fine as the locking coat of epoxy primer sealer has yet to go on at this point. Of note is the high spot ridge revealed on the upper rear flank behind the side window. This is where an inner panel is bonded to the outer skin to form a box section and over time the inner panel has pushed outwards. All unpainted (and several painted ones) will have a ridge here. A similar effect can be seen on the boot lid of the Gold convertible where the reinforcing frame distorts the outer panel.
The important part at this stage is to get the surfaces right. You will notice that the spray booth has strip lights with clear glass covers. This is so that the reflection of the lights will appear as straight lines on a flat surface, and curved lines on curved surfaces. Any ripples, high spots, or low spots will appear as ripples in the line of the reflected light. The painter will move his head to follow the reflection across a panel to check that the line of the light follows a smooth transition across the curves.
The next photo was taken immediately after the locking coat was applied and before it had been scuffed up. The reflection of the light strips in this photo illustrate how the lines of the car can be observed.
CIMG2323 by Alistair Courtney, on Flickr-
ACourtney - Posts: 488
- Joined: Thu Dec 04, 2008 12:22 pm
- Location: Oxford
Re: Mk 2 Rebuild (to replace the company car)
![]() by Kadmandu » Mon Sep 09, 2019 10:09 pm
by Kadmandu » Mon Sep 09, 2019 10:09 pm
hi "Gusty winds", thanks - its been a few weeks of night work to get this far......in between the day job, i just wish the car had come with the 1380 engine as per the v5..... but the owner wanted to keep it for his marcos build.
Alistair
Wow, thank you, some great advice there, not only for me but for anyone else taking on a project.... having chatted with a few chaps in the club and your post ive learned to be more "brutal" with exposing the gelcoat.....ie the dremel now has a huge milling bit in it and if in doubt.....ive just attacked it with a grinder and DA sander back to fibreglass - luckily it all looks superficial after very close inspection so i suspect it was a car park post type bump to the front (cracked bumper seems to have taken most of it.
I will post updates soon ......and i warn you.....i have a mahoosive list of parts that i will be ringing you for soon lol.
Thanks again chaps
Tim
Machines are designed to be used.....so get out there and enjoy 
- Kadmandu
- Posts: 10
- Joined: Thu May 30, 2019 6:52 pm
- Location: Halifax, West yorkshire
Re: Mk 2 Rebuild (to replace the company car)
![]() by Kadmandu » Mon Sep 09, 2019 11:11 pm
by Kadmandu » Mon Sep 09, 2019 11:11 pm
hi all, just a quick update....have been cracking on.....
ive got a bit bored of sanding the body so just to mix it up i started timkering with a few other bits of bodywork which need repair .....firstly, the bumper.
So it looks like its had a below 5mph bump in the past - luckily the mk2 bumpers look to have taken most of the force (have taken the gelcoat back on the shell and all good so rebuilt back up in resin).
some very dodgy historic fibreglassing...
 IMG_20190706_154422[1] by Timothy Ordway, on Flickr
i found this chaps name on everything - the builder/ glasser maybe?
 IMG_20190706_154424 by Timothy Ordway, on Flickr
old fibreglass pulled out - wasnt too hard (then sanded/ ground for good key).
 IMG_20190706_193506 by Timothy Ordway, on Flickr
some slightly better fibreglassing - first effort in 10 years - pleased i practiced on the bumper and it all came back to me ie loads of resin - mat over and dab until it settles - bit more resin and gently stipple etc until all settled - and repoeat lol.
 IMG_20190706_201657 by Timothy Ordway, on Flickr
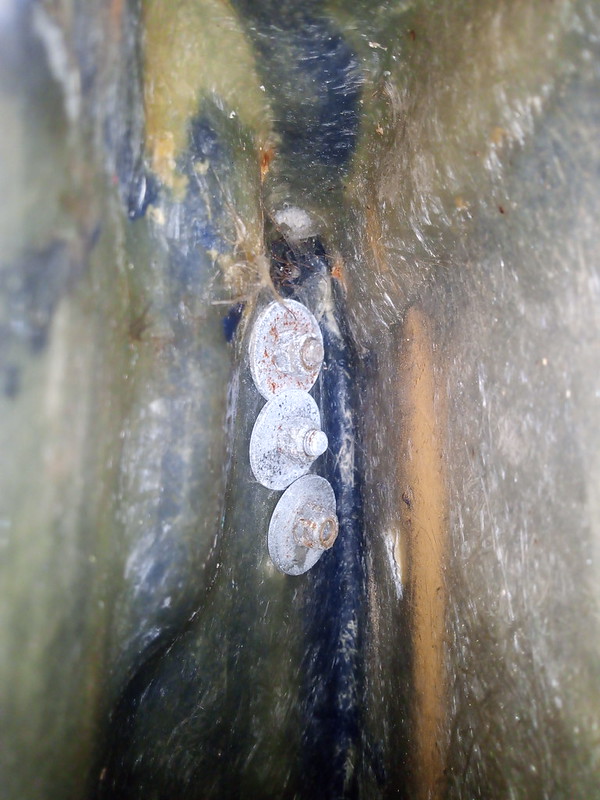
thought id have a tinker with the doors - bit of surface rust - not too bad but clearly lots of pop rivets used directly to the door has meant loads of cracking to the gelcoat - think i might fepair all the holes with resin and use some good countersunk/ flat screws maybe?
 IMG_20190630_175831 by Timothy Ordway, on Flickr
ps - that winder arm really is a bit of a "hold it up bob - yep, that looks right, weld it there" kind of a thing..... will probably just clean and repaint as it works.
you can see the pop rivets a bit closer in this:
 IMG_20190630_175845 by Timothy Ordway, on Flickr
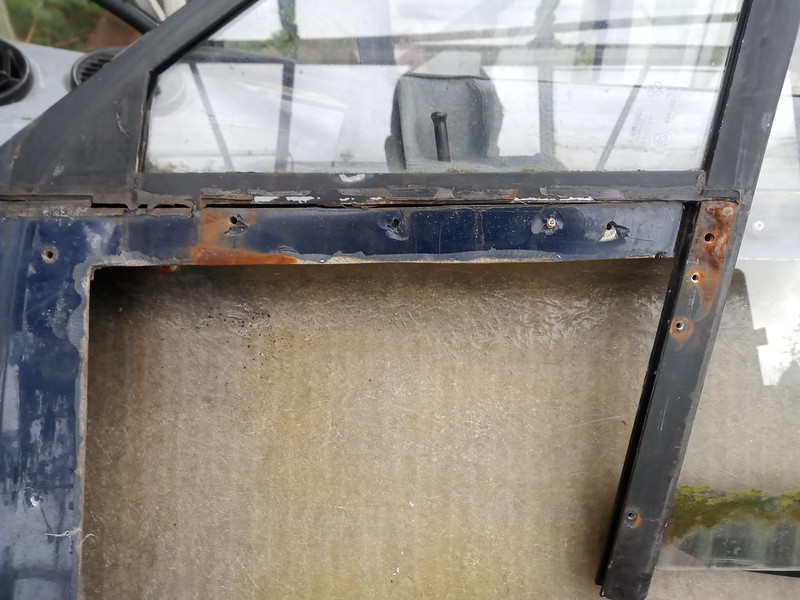
the top of the door has a few bits missing so some repairs there to do, the aluminium angle (talked about on forums) has cracked at the weld with the glass frame as i suspected - once you unscrew it it literally flaps about! no wonder the top of the door wasnt alligned well - some crafty reinforcement here when putting back together i think.
 IMG_20190630_175905 by Timothy Ordway, on Flickr
Getting there - oh good lord - more cracked gelcoat - lots of resin repair practice here to do...
 IMG_20190630_183142 by Timothy Ordway, on Flickr
Just a photo to see how it all looks when the frame is out
 IMG_20190630_183515 by Timothy Ordway, on Flickr
Ah - it is a ford door handle! might need to get a new handle one side - rusty pins etc and thought id post a photo of the part code.....
 IMG_20190630_184843 by Timothy Ordway, on Flickr
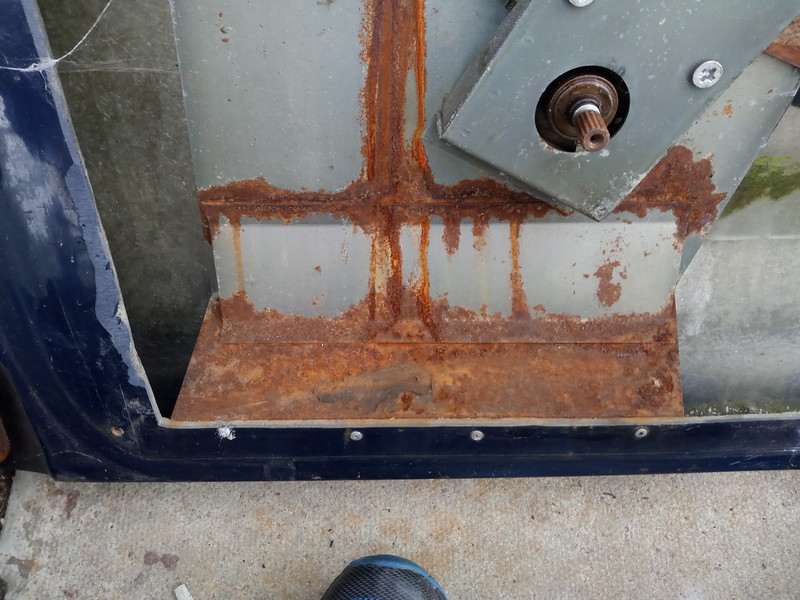
Now.....door hinges - the perennial debate - complete replace or repair, well at least the bolts are well protected from the weather - i wouldnt like to try to crack these nuts - only just enough room for a ring spanner:
 IMG_20190630_184853 by Timothy Ordway, on Flickr
So - once off - the bottom hinge is very slack and the top almost rusted solid..... the odd thing is they look different sizes when put side by side, anyone know if they are different upper and lower hinges or just stretched from use etc?
 IMG_20190630_185656 by Timothy Ordway, on Flickr
So the door fully stripped sanded back and inspected is in really good shape! just the repairs to all the holes and its fine - doesnt look half as daunting when stripped:
 IMG_20190630_205344 by Timothy Ordway, on Flickr
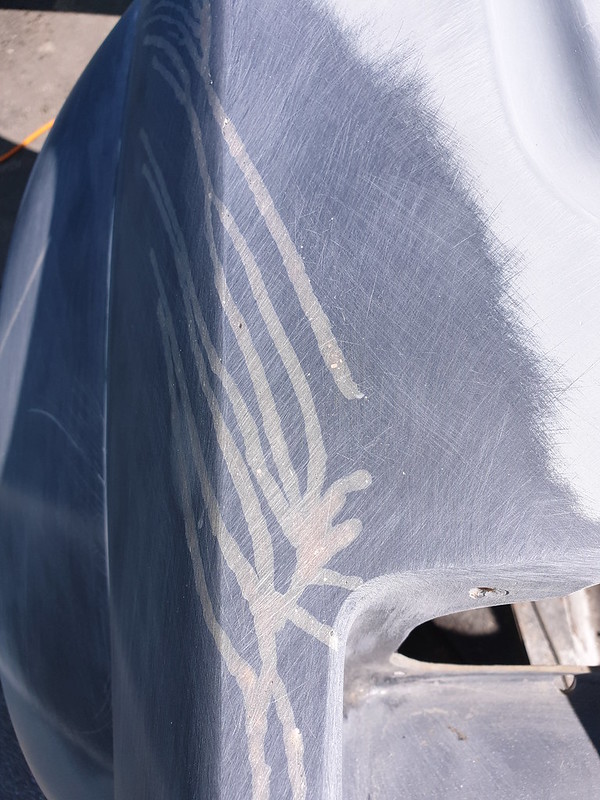
Anyway - cant avoidit - back to the bodywork.... heavy handed dremel work and alot of shining bright lights through the shell have reassured me that the fibreglass "flexed" when it had its bump - no signs of structural cracking or delaminating so straight on with the resin repairs - im using the west system epoxy with a filler agent (spent ages discussing it with a professional boatbuilder re the best systems to use on gelcoats)....... looks kind of funky....
 20190824_130759 by Timothy Ordway, on Flickr
a bit closer photo - the trick here (thanks guys from the club for the advice) is that the resin repair and the gelcoat are differing densities - so you need to do long blocking strokes or you end up with raised "ridges" where the repairs are - ive learned the hard way as usual...
 20190824_130804 by Timothy Ordway, on Flickr
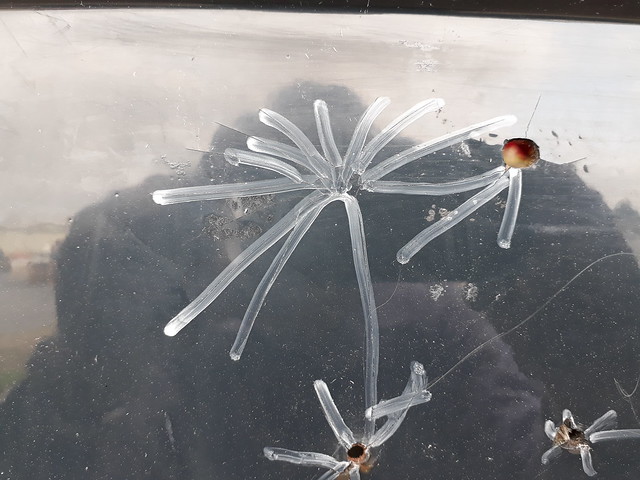
Now after a bit of dust coat, you can see the micro stress cracks all over the rear quarters - when ground down they are only just under a mm deep so ive just ground back to good gelcoat and built back up with resin - lots and lots and lots of coats - i bet it still cracks after a year lol - hey ho - i have to accept its an old car at some point - do my best and understand that the first road hump i hit will expose new cracks - and that will be part of the charm (maybe i will just put a little red dot on the end of each crack as we did in my flying days when inspecting the wings).
 20190825_145130 by Timothy Ordway, on Flickr
Nearly missed this one - corners and hinges of the bonnet mount - sorted
 20190904_222731 by Timothy Ordway, on Flickr
Oh look - i found another one lol - although i like the look of this crack repair - almost caterpillar in shape.
 20190908_115918 by Timothy Ordway, on Flickr
So, for some realism - this is the donor mini - my first car - very sad after dad kicked it out of his garage 2 years ago - the shell has literally gone from being "restorable" to OMG in 2 years! its near boston in lincolnshire so i suspect the sea air has a big part to play.
 20190811_100133 by Timothy Ordway, on Flickr
Now sorry i dont have any photos of the action - but under that tarp is the 1293 stage 2 i built from block about 10 years ago, dad turned it over every few months until last year when she was winterised with oil in bores etc......so, after some cleaning of the starter bendix , oil flush, carb clean & remote fuel tank, running in oil and a battery, it started fine - bit noisy but thats just the complete absence of silencer lol.
So hopefully it will just be a light recondition (head, gearbos off, clean and seals etc).
 20190811_100143 by Timothy Ordway, on Flickr
So on to the bonnet (avoiding the body again....well all i can say is star cracks - everywhere - attacked the "bulge" with the dremel and repairs under way.
 20190904_222659 by Timothy Ordway, on Flickr
Crack at one side (loss of strength to lip) so ragged right back - cosmetic repair to top - underside DA sanded as thin as i dare and rebuilt back up in ned fibreglass matt/ resin etc (forgot to photo as it was the first thing going well so didnt want to jinx it lol).
 20190904_222721 by Timothy Ordway, on Flickr
If you sqint - you can almost imagine it finished....
 20190905_082343 by Timothy Ordway, on Flickr
Well, even corners need a bit of love - a few hours spent making sure the chipped corner matched the other side:
 20190908_203953 by Timothy Ordway, on Flickr
SOOOOOOO - Excited - ti "think" i may nearly have finished the main repairs - first barcoat laid on (necessary as despite endless sanding - im sure there will be some cellulose somewhere to ruin my day - awesome stuff - bonds amazingly to a good 200 grit key and now just have to finish the front valance and fill all those devilish pinholes........
Like these - everywhere......
 20190727_225836 by Timothy Ordway, on Flickr
Progress to date - looking ready fro some high build primer i think......after finishing the front valance.
 20190908_142118 by Timothy Ordway, on Flickr
 20190908_142124 by Timothy Ordway, on Flickr
so to finish this update - i will be honest, there have been times when ive been so fed up with the prep work i could have cried, its way way harder than prepping a steel car (my last resto - a VW camper was easier to block than this) but ive stuck with it. ive had lots of advice, some good, some less so but always well meaning and supportive so to anyone who has been there before - i now understand what you mean by "prepping is the key" ie "dig in for an extended stay - this is going to get messy". I might not have done a concourse job, ie it might not be the best resto - but its my best, and am really pleased.
ive got a bit bored of sanding the body so just to mix it up i started timkering with a few other bits of bodywork which need repair .....firstly, the bumper.
So it looks like its had a below 5mph bump in the past - luckily the mk2 bumpers look to have taken most of the force (have taken the gelcoat back on the shell and all good so rebuilt back up in resin).
some very dodgy historic fibreglassing...
IMG_20190706_154422[1] by Timothy Ordway, on Flickri found this chaps name on everything - the builder/ glasser maybe?
IMG_20190706_154424 by Timothy Ordway, on Flickrold fibreglass pulled out - wasnt too hard (then sanded/ ground for good key).
IMG_20190706_193506 by Timothy Ordway, on Flickrsome slightly better fibreglassing - first effort in 10 years - pleased i practiced on the bumper and it all came back to me ie loads of resin - mat over and dab until it settles - bit more resin and gently stipple etc until all settled - and repoeat lol.
IMG_20190706_201657 by Timothy Ordway, on Flickrthought id have a tinker with the doors - bit of surface rust - not too bad but clearly lots of pop rivets used directly to the door has meant loads of cracking to the gelcoat - think i might fepair all the holes with resin and use some good countersunk/ flat screws maybe?
IMG_20190630_175831 by Timothy Ordway, on Flickrps - that winder arm really is a bit of a "hold it up bob - yep, that looks right, weld it there" kind of a thing..... will probably just clean and repaint as it works.
you can see the pop rivets a bit closer in this:
IMG_20190630_175845 by Timothy Ordway, on Flickrthe top of the door has a few bits missing so some repairs there to do, the aluminium angle (talked about on forums) has cracked at the weld with the glass frame as i suspected - once you unscrew it it literally flaps about! no wonder the top of the door wasnt alligned well - some crafty reinforcement here when putting back together i think.
IMG_20190630_175905 by Timothy Ordway, on FlickrGetting there - oh good lord - more cracked gelcoat - lots of resin repair practice here to do...
IMG_20190630_183142 by Timothy Ordway, on FlickrJust a photo to see how it all looks when the frame is out
IMG_20190630_183515 by Timothy Ordway, on FlickrAh - it is a ford door handle! might need to get a new handle one side - rusty pins etc and thought id post a photo of the part code.....
IMG_20190630_184843 by Timothy Ordway, on FlickrNow.....door hinges - the perennial debate - complete replace or repair, well at least the bolts are well protected from the weather - i wouldnt like to try to crack these nuts - only just enough room for a ring spanner:
IMG_20190630_184853 by Timothy Ordway, on FlickrSo - once off - the bottom hinge is very slack and the top almost rusted solid..... the odd thing is they look different sizes when put side by side, anyone know if they are different upper and lower hinges or just stretched from use etc?
IMG_20190630_185656 by Timothy Ordway, on FlickrSo the door fully stripped sanded back and inspected is in really good shape! just the repairs to all the holes and its fine - doesnt look half as daunting when stripped:
IMG_20190630_205344 by Timothy Ordway, on FlickrAnyway - cant avoidit - back to the bodywork.... heavy handed dremel work and alot of shining bright lights through the shell have reassured me that the fibreglass "flexed" when it had its bump - no signs of structural cracking or delaminating so straight on with the resin repairs - im using the west system epoxy with a filler agent (spent ages discussing it with a professional boatbuilder re the best systems to use on gelcoats)....... looks kind of funky....
20190824_130759 by Timothy Ordway, on Flickra bit closer photo - the trick here (thanks guys from the club for the advice) is that the resin repair and the gelcoat are differing densities - so you need to do long blocking strokes or you end up with raised "ridges" where the repairs are - ive learned the hard way as usual...
20190824_130804 by Timothy Ordway, on FlickrNow after a bit of dust coat, you can see the micro stress cracks all over the rear quarters - when ground down they are only just under a mm deep so ive just ground back to good gelcoat and built back up with resin - lots and lots and lots of coats - i bet it still cracks after a year lol - hey ho - i have to accept its an old car at some point - do my best and understand that the first road hump i hit will expose new cracks - and that will be part of the charm (maybe i will just put a little red dot on the end of each crack as we did in my flying days when inspecting the wings).
20190825_145130 by Timothy Ordway, on FlickrNearly missed this one - corners and hinges of the bonnet mount - sorted
20190904_222731 by Timothy Ordway, on FlickrOh look - i found another one lol - although i like the look of this crack repair - almost caterpillar in shape.
20190908_115918 by Timothy Ordway, on FlickrSo, for some realism - this is the donor mini - my first car - very sad after dad kicked it out of his garage 2 years ago - the shell has literally gone from being "restorable" to OMG in 2 years! its near boston in lincolnshire so i suspect the sea air has a big part to play.
20190811_100133 by Timothy Ordway, on FlickrNow sorry i dont have any photos of the action - but under that tarp is the 1293 stage 2 i built from block about 10 years ago, dad turned it over every few months until last year when she was winterised with oil in bores etc......so, after some cleaning of the starter bendix , oil flush, carb clean & remote fuel tank, running in oil and a battery, it started fine - bit noisy but thats just the complete absence of silencer lol.
So hopefully it will just be a light recondition (head, gearbos off, clean and seals etc).
20190811_100143 by Timothy Ordway, on FlickrSo on to the bonnet (avoiding the body again....well all i can say is star cracks - everywhere - attacked the "bulge" with the dremel and repairs under way.
20190904_222659 by Timothy Ordway, on FlickrCrack at one side (loss of strength to lip) so ragged right back - cosmetic repair to top - underside DA sanded as thin as i dare and rebuilt back up in ned fibreglass matt/ resin etc (forgot to photo as it was the first thing going well so didnt want to jinx it lol).
20190904_222721 by Timothy Ordway, on FlickrIf you sqint - you can almost imagine it finished....
20190905_082343 by Timothy Ordway, on FlickrWell, even corners need a bit of love - a few hours spent making sure the chipped corner matched the other side:
20190908_203953 by Timothy Ordway, on FlickrSOOOOOOO - Excited - ti "think" i may nearly have finished the main repairs - first barcoat laid on (necessary as despite endless sanding - im sure there will be some cellulose somewhere to ruin my day - awesome stuff - bonds amazingly to a good 200 grit key and now just have to finish the front valance and fill all those devilish pinholes........
Like these - everywhere......
20190727_225836 by Timothy Ordway, on FlickrProgress to date - looking ready fro some high build primer i think......after finishing the front valance.
20190908_142118 by Timothy Ordway, on Flickr20190908_142124 by Timothy Ordway, on Flickrso to finish this update - i will be honest, there have been times when ive been so fed up with the prep work i could have cried, its way way harder than prepping a steel car (my last resto - a VW camper was easier to block than this) but ive stuck with it. ive had lots of advice, some good, some less so but always well meaning and supportive so to anyone who has been there before - i now understand what you mean by "prepping is the key" ie "dig in for an extended stay - this is going to get messy". I might not have done a concourse job, ie it might not be the best resto - but its my best, and am really pleased.
Machines are designed to be used.....so get out there and enjoy
- Kadmandu
- Posts: 10
- Joined: Thu May 30, 2019 6:52 pm
- Location: Halifax, West yorkshire
Re: Mk 2 Rebuild (to replace the company car)
![]() by DavidL » Sat Aug 29, 2020 10:55 pm
by DavidL » Sat Aug 29, 2020 10:55 pm
i found this chaps name on everything - the builder/ glasser maybe?
Mr/Ms/Miss Harvard would have been the first owner for whom the car was built.
-

DavidL - Posts: 858
- Joined: Tue Mar 01, 2011 10:15 pm
- Location: Tayport, Fife
Re: Mk 2 Rebuild (to replace the company car)
![]() by max midas » Fri Sep 18, 2020 6:35 pm
by max midas » Fri Sep 18, 2020 6:35 pm
Great rebuild thread, how much further have you got in the last 12 months?
- max midas
- Posts: 181
- Joined: Tue Dec 02, 2008 11:32 pm
- Location: somewhere under the engine - again!
18 posts
• Page 2 of 2 • 1, 2
Return to Complete Midas rebuild
Who is online
Users browsing this forum: No registered users and 5 guests