Mk 1 Project Zippy. Looking Like a Car.

If you're taking on the task of rebuilding the whole Midas, please put the project in here.

Moderator: The Midas Forum Staff

Re: Mk 1 Project Zippy (Picture Heavy!)

Postby MrBounce » Wed Mar 16, 2016 11:23 am

I know exactly what you mean re the bodywork!! Can't wait to get the spraying done and dusted... 8-)

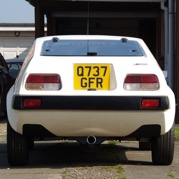
I have received a few items from my eBay splurge, and among them was a can of chrome spray paint. I have struggled to get a decent shine on the tarnished rear light units, so to aid shine I thought I would use some of this stuff. I spent ages with some sandpaper making sure that all surfaces were suitably keyed on both the rear lights and also the front indicator/sidelight units, then gave them a good coat of the stuff in the garage. Have to say I am quite pleased how well it's turned out. There should be a suitable amount of reflection now.

I have also received a full set of manifold studs, brass nuts and appropriate washers, a pair of half-decent windscreen washers and a pair of gear selector mounting bobbins. The mirror and interior light combo also turned up, but the light lens was broken. To their credit the seller has immediately offered to send a replacement lens free of charge. Top bloke!

Newly "chromed" rear light units. They'll do. :)

Image

Some of the eBay haul. Replacement mirror/light combo to follow.

Image
MrBounce
 
Posts: 661
Joined: Mon May 16, 2011 9:16 pm
Location: Suffolk

Re: Mk 1 Project Zippy (Picture Heavy!)

Postby Jon » Wed Mar 16, 2016 7:42 pm

I found that Autoglym metal polish brought up a nice shine when I refurbished my rear lights. I couldn't find anything better than finger power to get into all the corners, but the result was worth it. It's been eighteen months since I polished them and they haven't noticeably dulled down at all.

Image

Image
User avatar
Jon
 
Posts: 147
Joined: Wed Dec 03, 2008 9:12 am
Location: Haynes

Re: Mk 1 Project Zippy (Picture Heavy!)

Postby goldeneye » Fri Mar 18, 2016 8:42 am

Some clearcode spray paint on them will help to keep it shiny.
Midas Mk II
goldeneye
 
Posts: 75
Joined: Sat Sep 03, 2011 5:45 pm

Re: Mk 1 Project Zippy (Picture Heavy!)

Postby MrBounce » Sun Mar 20, 2016 9:29 pm

Jon I had tried Autosol but despite my best efforts the best I could get was just a dull shine. I think the combination of failed seals and being left in a garden for 11 years had put them past their best and no amount of polishing was going to work. Shame.

During my recent garage clear-up (it still looks like a tip) I noticed something about the subframe which I wasn't happy with. The rubber boots on the knuckle joints were starting to perish. I can't remember where they came from, but they should last longer than a couple of years - and that's being kept inside. As a plus point whilst helping Tink with his clearout, we found Matt's pair of Adjusta-Rides, brand new and still boxed. A (very reasonable) price was arranged and they returned home with me. The adjustable cones on my subframe were generic no-name types and although there's no reason why they won't work just fine, I would be happier with a more well-known brand. I also plan to paint the metal part of the cones, as they are looking tarnished.

So after borrowing Tink's cone compressor, I whipped out the old cones and knuckle joints. Whilst they're off I can also fit the top arm rebound buffers - for some reason I had 3 new ones, but when I fitted the cones, I could only find one of them. So that's been put on the list of "must-dos".

Old cones out...

Image

...because of this...

Image

...and these...

Image
MrBounce
 
Posts: 661
Joined: Mon May 16, 2011 9:16 pm
Location: Suffolk

Re: Mk 1 Project Zippy (Picture Heavy!)

Postby MrBounce » Sun Mar 20, 2016 9:29 pm

...and the need to fit these.

Image
MrBounce
 
Posts: 661
Joined: Mon May 16, 2011 9:16 pm
Location: Suffolk

Re: Mk 1 Project Zippy (Picture Heavy!)

Postby Geoff Butcher » Sun Mar 20, 2016 9:50 pm

I'm afraid that's par for the course for many rubber components these days, boots often fail before the ball joint and that is now an MoT fail instead of an advisory. Lucky I'm not paranoid or I might think they're out to get me...
Geoff
User avatar
Geoff Butcher
 
Posts: 751
Joined: Fri Dec 05, 2008 9:10 pm
Location: Braintree

Re: Mk 1 Project Zippy (Picture Heavy!)

Postby fozzza » Mon Mar 21, 2016 9:39 pm

Geoff Butcher wrote:I'm afraid that's par for the course for many rubber components these days, boots often fail before the ball joint and that is now an MoT fail instead of an advisory. Lucky I'm not paranoid or I might think they're out to get me...

I wonder whether it is poor quality components that has this premature effect or is there still a lot of new old stock parts out there. :o
Roy
User avatar
fozzza
 
Posts: 230
Joined: Sun Nov 22, 2015 5:25 pm
Location: Wolverhampton, West Midlands

Re: Mk 1 Project Zippy (Picture Heavy!)

Postby Stuart » Mon Mar 21, 2016 11:02 pm

fozzza wrote:I wonder whether it is poor quality components that has this premature effect or is there still a lot of new old stock parts out there. :o


Definitely new parts that have the issue. New old stock has decent rubber.
User avatar
Stuart
 
Posts: 1732
Joined: Tue Dec 02, 2008 8:29 pm
Location: Derbyshire

Re: Mk 1 Project Zippy (Picture Heavy!)

Postby MrBounce » Fri Mar 25, 2016 5:00 pm

Not much more to report other than I have taken out the bottom arms, end plates and doughnuts and have given them a coat of the same paint as the engine, radius arms and hubs. The top arms were bought painted in a slightly different shade of blue - although I thought it wouldn't bother me, it did start to niggle so as I had everything apart, I may as well give them a fresh coat. I have also fitted the 2 new top arm rebound buffers, but I think they're so boring I didn't bother taking a picture...

Freshly painted doughnuts, top arms and...

Image

...end plates. Those aren't chips by the way - it's light reflecting!

Image
MrBounce
 
Posts: 661
Joined: Mon May 16, 2011 9:16 pm
Location: Suffolk

Re: Mk 1 Project Zippy (Picture Heavy!)

Postby MrBounce » Sun Apr 10, 2016 10:11 pm

I have a clean (er) garage. This meant that I could once again drag out the subframe and refit the doughnuts, new Adjusta-Rides (SO much lighter than the copies!) and knuckles and of course the repainted top arms. Out came the cone compressor and after a short while remembering the best way to put everything back together, both sides were back in and tightened up. I even managed to line up the word "Dunlop" so it showed through the front opening of the suspension tower - I'm a bit OCD like that.

I have finally got hold of a new lens cover for my "new" interior mirror/light combo. I was originally going to return it but he found some new lens covers and for my inconvenience sent 2. Ironically I'd bought another mirror in that time, but this had a broken lens too. So I now have 2 complete mirrors. Erm...

Newly painted doughnuts, freshly fitted with...

Image

...genuine Adjusta-Rides. Lovely.

Image
MrBounce
 
Posts: 661
Joined: Mon May 16, 2011 9:16 pm
Location: Suffolk

PreviousNext

Return to Complete Midas rebuild

Who is online

Users browsing this forum: No registered users and 7 guests

cron